A deeper dive into Nikola Motors

Unlike my other articles, this one is totally about finance, and a stock from a new company called Nikola Motors (NKLA)

There are currently way too much stories covering this new start up, so I hope that I can compile a short and concise list of my observations about this company that will help you come up with your own conclusion about Nikola Motors.  I’ve spent hours in researching so you don’t have to, or better yet, encourage you to do some deep dives of your own.

Technology

The most important aspect of evaluating a start up is the product and promise.  For example, when Tesla say they will come up with a good electric car, the important question is “are the technology available and can they make it profitable?”.  Nikola touts two main aspects as their mote – one is their hydrogen delivery network, and second is their battery breakthrough technology.

Hydrogen

To dive into the technical aspects will be repeating hours of materials you can find on YouTube.  Simply put, it is very expensive and very slow to produce hydrogen with current technology.  You end up taking a lot of energy, and the process is very slow.  Existing technology of producing hydrogen through electrolysis is prohibitively expensive.  Even if you omit the price of each fueling station costing more than 6 million dollars.  Each station can produce 300kg of fuel per hour, enough for 3.8 trucks.  Which means the cost will go up if a station has more than 4 trucks fueling per hour, and more generators will need to be installed.  This have not yet put into consideration the cost to produce hydrogen itself, which is about $2 according to Nikola (which is impossibly optimistic even for 2025), not counting compression and storage.

Think about it.  Around 375,000 for a semi truck, 6 million for one charging station that can handle three truck at a time.  If you have a fleet of 12 trucks on one route with 2 charging station, it would cost at least 16 million dollars to get started.  Each truck drives an average of 45,000 miles a year, which makes $513,000 dollars revenue.  A stupidly optimistic cost for fuel at 25cents / mile would make $135,000 for fuel, plus $36,000 for yearly maintenance on 12 trucks means this fleet would generate $342,000 a year.  The whole system would turn a profit after 46 years, assuming no employee need to get paid, and rent cost for each fuel station, construction for the station and service centers were all free.

Without any breakthroughs, there are high doubts in how Nikola can achieve profitability.  This is not manufacturing where things just get a lot cheaper through volume.  Any promise of a profitable business model hinges on breakthrough that might not even happen in the next few years.

Currently Nikola purchase all their equipment from Nel ASA in Norway.  They’re not developing anything themselves to reduce their cost.  The only reason their model could work is if they continue getting capital without any regard of results.  Whether this fact will catch up to them depends on when shareholders actually realize this fact a few quarters later.

Battery

Nikola literally said that they don’t have any engineers with patents or breakthroughs, instead they found professors who had been “studying batteries for a long time”, and license patents from these professors to come up with their new battery breakthrough that can achieve 900kw/h density.  Doesn’t this mean exactly that any other company can approach the same “professors” and achieve the same thing?  Isn’t other companies such as Ford and GM doing the exact same thing, finding and talking to other experts in the field, yet somehow Nikola now has some breakthrough which by itself is worth billions?  Forget hydrogen trucks.  If talking to a few professors can create a breakthrough then this alone will be enough to create a fortune 500 company.

On the technical side they made no mention of solid state or dry battery electrode, or anything close to the recent research data from experts such as Jeff Dahn, John Goodenough, Shirley Meng.  People are guessing that it might be some sulfur based chemistry, but it’s back to the fact that Nikola so far shared absolutely zero facts about what their technologies are based upon.  This goes for hydrogen and battery.

Breakthroughs don’t just happen in a vacuum.  Tesla is about to announce their breakthrough, but you can already follow the breadcrumbs leading to what they will announce.  From the acquisition of Maxcell technology, to the public research papers from professors who actually partnered with Tesla, people had already figured out what battery chemistry will be involved and what the targeted capacity should be like.  It’s hard to imagine that Nikola, without any acquisition or real partnerships, can come up with breakthroughs that eluded everybody on the planet.

Production

Note that Nikola show off its line up of products, but none will be produced by Nikola motors.  They tout vertical integration, but in the very same interview say that they only work with partners in every single aspect of its production.  Shortly after that they say that they won’t have parts problems as Tesla does through their own service centers because Nikola will only work with dealerships, and when asked about how will dealerships get the necessary parts, their answer is that Nikola will manufacture the parts for all their dealers.  Nikola gives a very convoluted picture of how they will produce everything that they’re showing off.  Let’s assume that first rate manufactures will all come out from the woodwork and be able to produce all these products to the standard that we expect form existing automakers.  Wait who are these partners?

Roadmap

Another alarming fact about Nikola is their roadmap, where anything remotely close to having a proof of concept in terms of technology and profitability is still years away.  Compared to Tesla when it was worth as much as Nikola, Tesla had already built production cars with thousands of customers, as well as a small charging network.

Public Offering Through VTIQ

Nikola at the point of public offering literally has no product and no revenue.  They offer prototypes which is exactly the same as where Rivian motors is by showcasing a concept car.   By that nature Rivian should be able to raise billions in the public market based on the fact that they have a contract with Amazon for thousands of delivery trucks.  But they can’t go IPO because they simply don’t have the sustained revenue.  Hence Nikola didn’t IPO, but instead had this whole merger with VTIQ.  The very fact that Nikola don’t qualify to IPO should already raise alarms.  Checks and balances were setup for a reason.  It’s crazy why this being circumvented isn’t a huge deal.

Sustainable Transport

Many people wish for Nikola to succeed because of the promise of advancing another means of sustainable transport.  Personally I always wish that a green fuel either from creating hydrogen through electrolysis, or biofuel based on plant or plankton.  But the will to do good alone can’t be the main factor for supporting a company.  This had never been more clear through the story of Theranos:  A company with the mission to liberate blood testing for the masses.  By merits alone Theranos should get everyone’s support, but the fundamentals of how ready was this technology and whether it had been proven had to be answered before us, the common people should be offered to invest in such a company.  This is why venture capitals exist.  As the name implies, venture capitalists take on the big risks, deal with proof, and possible scams, instead of putting the burden on the common people.  We the common people shouldn’t be offered such extensive risks, or worse yet, a string of promises that might go up in smoke.

Focus

Amazon did not start out by selling everything under the sun, Tesla did not start out by selling model S, X, 3, Y, Cybertruck and Semi.  Start up which do not laser focus on doing one thing very well usually do not end up succeeding.  Was there ever one company which did?  Nikola appeared and announced that they will do hydrogen, and also battery, which power their semi, pick up truck, jetski, ATV, and anything they can prototype.  How this start up company with 200 people will manage to do all these things, and do them well and competitively is improbable.  People put doubts in Tesla because Tesla claimed to build the Model 3, a single car to scale for the masses.  How can there be so much hype on a company with no manufacturing experience set out to make bold claims 10X of what Tesla had accomplished in 10 years?


Don’t forget they also label their trucks to be ready for autonomous driving while they haven’t developed one thing around this technology.  Adding to their list of improbable promises.

NKLA as an investment

At the end of the day, I really hope that I am wrong, and I would be laughed as Nikola introduce a new and sustainable energy transport system to the world.  There would be nothing better than that.  But if this turns out to be a hoax, it would in turn remove a lot of credibility of the green energy market, and taking money away from hard working people.

Meanwhile, please exercise caution when dealing with Nikola as an investment.  Have fun swinging the stock while it’s crazy, but don’t put too much of your fortune as a growth stock.  That’s my only suggestion out of all this.

Executive Team

This last aspect I don’t seem as important, as a good product can sell itself regardless of how bad the executive team is.  But if I focus on this aspect I can’t help but to see many red lights myself.

Generational companies such as Apple, Facebook, Amazon, and Tesla made their mark because their founders had a vision, and were able to execute this vision through the founder’s own grit, expertise and resourcefulness.    Nikola’s founder did not impress with any level of previous success or engineering know-how.  The founder put together the business plan, then literally sold the idea to an execute team, and have everybody else run the business as he take a back seat.  The CEO of Nikola is an executive from GM, while the founder sold 7 million of his shares and bought an estate in Utah in 2019.  Months later the founder would tell the world that his shares of Nikola is locked in for a year and he’s not going anywhere.  This combination of leadership and events just doesn’t inspire confidence.  Many would say that this doesn’t really matter, so I leave this section at the end.

PS – The founder just posted a tweet with threats of lawsuit for the reporter who written a scathing review of Nikola Motors.  This behavior is completely aligned with the fear centric tactics from people like Elizabeth Holmes at Theranos.  You can either fight negativity with facts and productivity, or you can instill fear to scare the news away.  Nikola chose the latter.
Logitech K750 Solar Keyboard Ugly Mod

Of all the Mac keyboards that I’ve used, my favorite has to be the Logitech K750.  The keys have short and responsive travel, yet soft to type on.  The wireless performance is also terrific.  The keyboard just have some charging problems:

It has a weak rechargeable battery, and you can’t charge the keyboard while using a keyboard drawer.

There’s no sunlight in the drawer, so I try to leave the keyboard on my desk when I’m away, but I can never do it often enough to keep it fully charged.  It might be unique to my situation, but I’ve read enough about the battery situation where the rechargeable battery also dies over time.  So I need to find a solution to my problem.

While meeting my deadline at 2am, it happened again.  The K750 ran out of battery.

Frustrated and eager to get back to work, I decided to simply swap out the battery in the keyboard with something that is not a dime sized watch battery.  I read up about how difficult it is to open the keyboard, so I wasn’t gonna spend 45 minutes trying.

What I used for this mod:

  • Dremel tool with a rotary saw attachment
  • soldering iron
  • 3.7v Lithium battery (i used 18650 battery with holder)

Instead, I grabbed my Dremel with the saw blade and went to work.  You can use a soldering iron to cut the plastic also.

img_1186

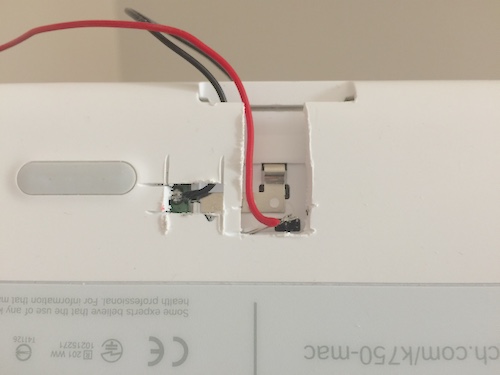
I followed the leads and found that there is a solder point for the ground lead, while the positive lead is free floating, so I soldered right onto the lead.

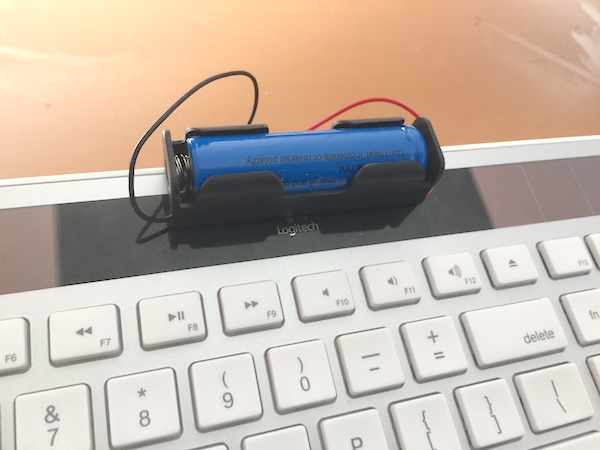
If I don’t want to hurt the keyboard, I can probably tape the wires onto the battery and shove the battery back, but I needed to get back to work, and I don’t plan on putting my keyboard on a beauty contest.  Especially given what’s about to happen up front:

img_1185

BAM!  Here comes the ugly stick!

The two wires lead to a standard 18650 lithium battery holder.  Talk about making your keyboard ugly.  But hey, this battery will probably last me more than a year, and I have 20 of these batteries sitting at home.

If I want things to look prettier I could have used a thin LiPo battery that my small drone uses, but I didn’t give a damn at 2 in the morning as I fought to get this puppy working again.

The keyboard sprung back to life as soon as the battery is inserted.  Hurray!  Now back to work!  It’s good to know that I never have to worry about keeping the keyboard charged again.  This keyboard will rest in the dark keyboard drawer till the end of time.

Batsh The Black Knight (FFS) Model Kit

mechs

I’ve always loved the robots found in the Five Star Stories series of anime and manga.  Their mechs are very stylized and expressive.  Unfortunately they aren’t all that popular, and their model kits are generally hard to find.

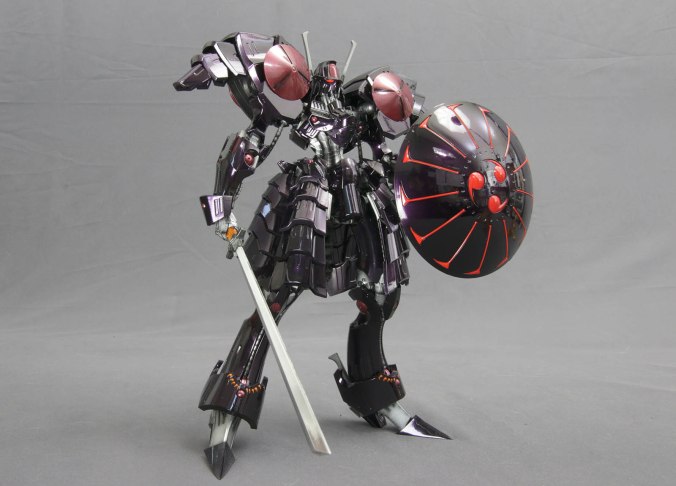
This year Volks released a second generation of the Five Star Stories mechas.  The one which caught my eye was the Black Knight model.

package

The model turns out to be quite a challenge to build, mainly because of two reasons:

  • Designs of mechs in FSS are style over function.  Many ankle or wrist joints are extremely narrow, making the overall model wobbly and unstable
  • Quality and design from Volks is primitive compared to Bandai’s Gundam model kits.  Parts often doesn’t fit snugly, while some designs are not well thought out.  For example, the wrist is held together by a shaft that’s 1.5mm in diameter.  It doesn’t have enough strength to hold it’s own shield in place.

This time around I found out how to create mirror finish from metallic paint, so I was eager to put it into use.  Just apply a layer of polyurethane ahead of time and the result is a mirror finish.

black-knight-1

I mixed clear red and clear blue into clear black to create a more purple finish.  Unfortunately the result was too purple for my liking.  Should have tested properly before proceeding.

The kit is extremely fragile and I’m afraid to touch it. 🙂

Wireless charging for iPhone6s wallet case

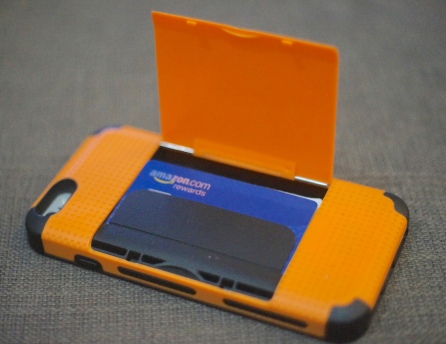
Tried out a “wallet case” for my iPhone 6S and it’s been pretty awesome.  Not having to carry a wallet separately had been great.  The model I’m using is one called “The Smuggler” (Link here)

DSC01376

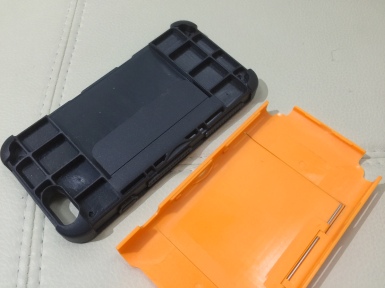
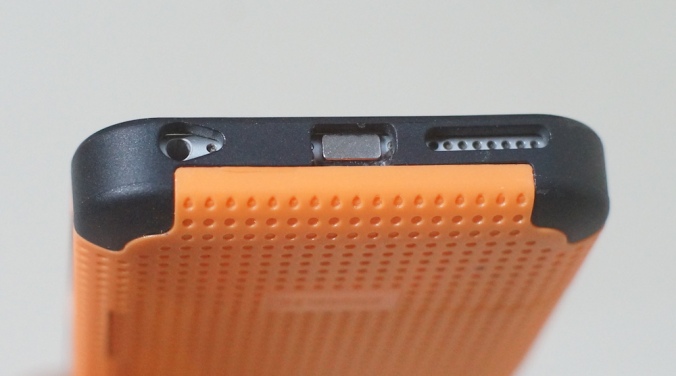
I noticed that there is some space above and below the door, and it looked like this:

IMG_6581

So the plan now is to stuff a wireless charging coil there so that I can use my phone with my charging pad which I’ve been using with my Nexus 7 tablet.

These charging coils are available in Amazon and Ebay.  I suggest Ebay as the entries are pretty specific for different phone models.

Peel the outside tape, and you’re left with the coil and the control board.

First step is to make room for the ribbon cable.  Easy job with a wire cutter or a Dremel grinder.

IMG_6586

Next, make room for the coil itself.

In the original package, the charging coil has a stiff tape that holds it in place.  I put that part of the tape back behind the coil, and bend the circuit backwards so it takes up less space.  The ribbon cable will need to be folded up.  Lucky for us there are plenty of space for the ribbon cable to fold.

Slip the iphone back into the case, then test the fit and make sure everything fits into the space you carved out.

DSC01374

The back of the case should snap back together, and that’s it

DSC01379

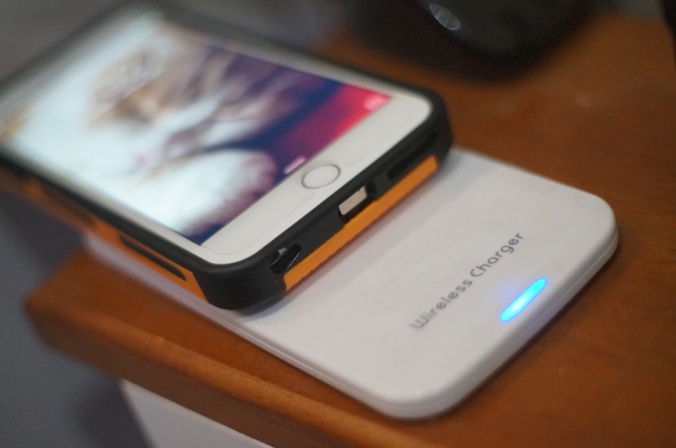
Success!  Let the charging begin!

Installing HEPA filter on your Makita vacuum

Note: This guide is for the Makita BCL180 or XLC02 18V Compact Vacuum.

MakitaVacuum

Since I own a host of portable power tools by Makita, it only made sense that I own the handheld vacuum also.  What I didn’t know is how powerful this little vacuum is!  It’s a no brainer if you have more than one of the 18V Makita batteries sitting at home.

As much as I love the vacuum, I did find the cloth filter to be a little lacking.  If the vacuum is used at home, bad smell or allergy is often a concern.  Also the cloth filter clogs up easily, reducing suction.

After some trial and error, I came across a VonHaus HEPA filter that actually works great with the Makita.  The HEPA filter also comes with its own mesh pre-filter, allowing you to not use the standard pre-filter and getting more space for the dirt container. (You can tip me by purchasing it through the link below. 😉

HEPA_filterGet the HEPA FILTER here

As you can see, the filter has a big wide plastic base that needs to be removed before it can work with the Makita.

What you need:

  • VonHaus HEPA filter (get it here)
  • tin snips or garden shears (optional)
  • wire cutter (or any cutter that can handle plastic)
  • 10 – 20 minutes

It might take longer the first time you’re doing it, but if you’re a handyman, this will be a fun and rewarding project which lets you see how powerful your little handheld vacuum can get.

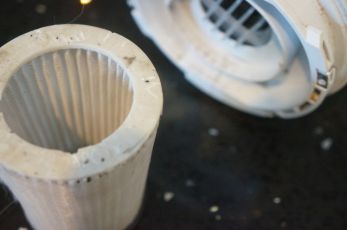
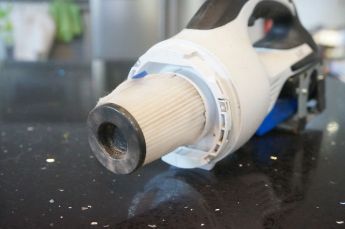
First, a picture of what the end result would look like:

DSC00568

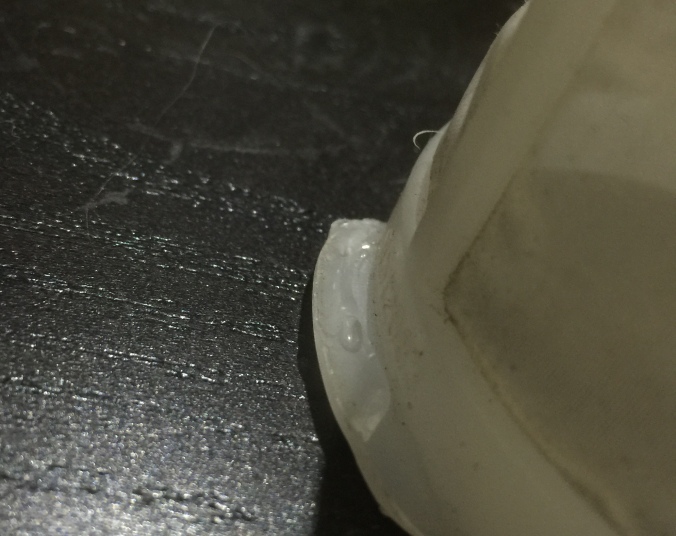
The base of the filter is actually made of rubber

DSC00567

The filter fits snuggly within the inside ring, the rubber helps form a tight seal and keeps it in place.

Step 1 – Remove outside edge of plastic base

The bad news is that the base of the HEPA filter is glued to the black plastic base, so you can’t just yank it out.

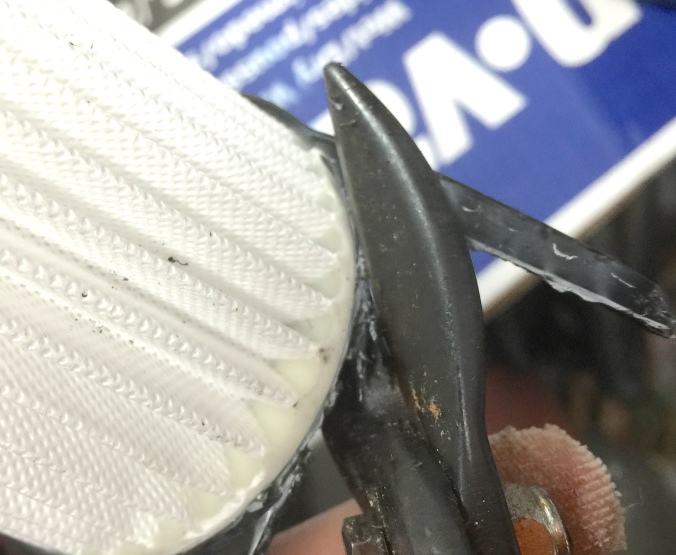
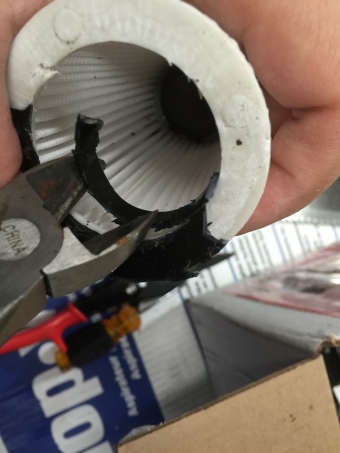
Time for some elbow grease.  Start sniping away until you get to the edge of the HEPA filter:

This is the easy part. 🙂

Step 2 – Remove the outside ring

As shown by the first picture, a ring covers the base of the HEPA filter.  You want to rip out this ring without damaging the HEPA filter itself.

IMG_6003.JPG

Just take your time and keep bending the outside ring away.  Take your time and don’t rip the soft rubber from the HEPA filter.

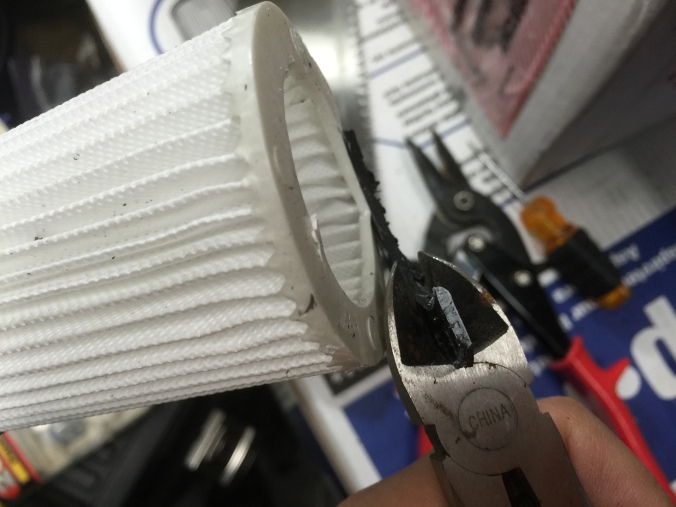
Step 3 – Remove the inside ring

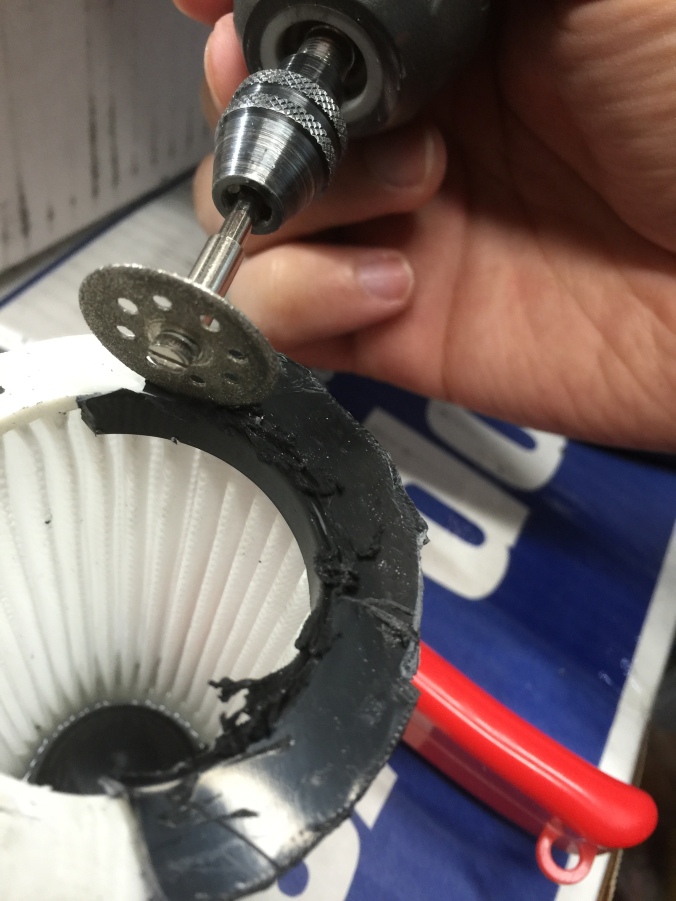
Time to remove the inside ring.  Here is when you should use a wire cutter.
IMG_6011

I use a Dremel tool to weaken the corner first, which made my life a lot easier when prying the ring away.

IMG_6014

Be careful not to damage the filter itself, but if you do, just patch any holes with heat glue or something.

Step 4 – Remove the backing

Last step is to remove the back.  Start with a screw driver or just go straight in with with the wire cutter.
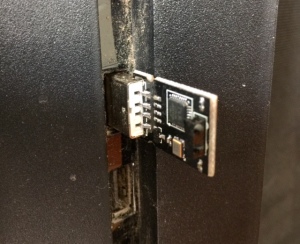
IMG_6017

Once you have a good grip on the plastic backing, just slowly pull the filter away.

That’s it!

So there you have it.  It’s a lot of trouble for a little filter, but it’s a small and fun project that breathes new life into the vacuum.  In an effort to keep the filter working longer I’ve decided to keep using the old mesh filter.  You’ll need to do something extra to make the mesh filter stay in place.  One solution is to make the ears thicker.
IMG_5987

If you want to know more about the handheld vacuum, here’s the link:
Get the Makita Handheld Vacuum here

How To : Setup Harmony Remote with FLIRC for Playstation 4 (PS4)

Good news for those who wish to control the Playstation 4 with your Harmony Remote!

Since Logitech had been dragging its ass on supporting the PS4 through bluetooth, we Harmony users had been dual wielding the remote and the PS4 controller when watching DVD and Netflix.
At last, there is an intermediate solution.  Not a perfect one, and it does require you to part with $23, but never the less I can now perform all the basic controls plus exit play mode to turn off the PS4 without using the controller, so I’m happy.

What you need is the FLIRC infrared dongle.  (amazon link).  It’s actually a really cool device for it works with any PC, OUYA, or other devices emulating a USB keyboard, and all the keys are customizable.  There’s a template for XBMC for those who have a spazzy XBMC setup at home.

FLIRC is new and support database is spotty, so I’ve included a set of instructions for Harmony users to get going:

1) Setup your Harmony Remote

harmonysetup

  • Add a new device in your Harmony setup.  The brand is FLIRC, and the model is XBMC
  • Edit your PS4 activity to use the FLIRC device to control your PS4
  • Go to the assign button menu, select “PS4”, click on the MENU button, and assign it as “INFO” in the FLIRC device.
  • (more info) https://flirc.zendesk.com/hc/en-us/articles/201676079-Harmony-Remote-Control

2) Setup the FLIRC device

  • Download the FLIRC GUI
  • Install the GUI first, before plugging device into your PC
  • Start the FLIRC setup program
  • Plug in your FLIRC dongle
  • Align the Harmony infrared hub to the FLIRC dongle
  • From the pull down menu, select “CONTROLLER”, then choose “keyboard”flirc keyboard
  • (more info) https://flirc.zendesk.com/hc/en-us/articles/202923419-Controllers-in-the-Flirc-GUI
  • At this point, assign Harmony buttons to the keyboard keys

3) Assigning Harmony Buttons

Before starting on steps 3 and 4, you can just download my configuration file and skip both steps! (Download config file here)

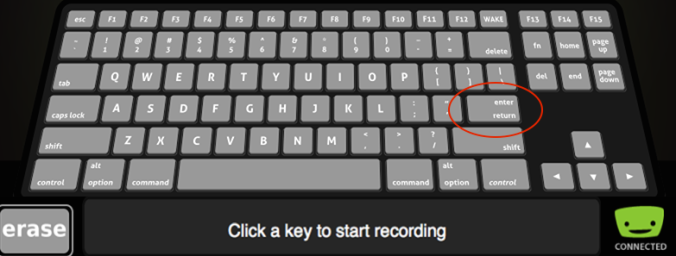
  • On the FLIRC setup program, click on the Enter key on the keyboardFull keyboard
  • Hit the OK button on the Harmony remote
  • Program should respond by saying “button learned”

Now the OK button is assigned!  Repeat for all other keyboard keys that are used by the playstation.  Here’s a list:

In the PS4 interface

Action Keyboard Key Harmony Key
Back Esc Exit
Dual Shock 4 Options button F3 Yellow
DS4 Share button Prt Sc/SysRq Record
Back to inserted disk menu Pause/Break Menu
Back Backspace Return
Enter Enter OK
Up Up arrow Up
Left Left arrow Left
Right Right arrow Right
Down Down arrow Down

In-movie controls

Action Keyboard Key Harmony Key
Pause/On-screen display Esc Exit
on-screen display F1 Red
Blu-ray pop-up menu F2 Green
Disc options/Netflix Pagedown F3 Yellow, Channel –
Netflix Pageup F4 Blue, Channel +
Pause/On-screen display Backspace Return
Bring up BD pop-up menu Up arrow Up
Close BD pop-up menu Down arrow Down
Moving in menus Right/left arrow Right/Left
Enter Enter OK

(more info) https://flirc.zendesk.com/hc/en-us/articles/203167509-Setting-up-Flirc-with-PS4

4) Assign the Pause/Break button

Notice that the Pause/Break button is crossed out, that’s because the GUI interface doesn’t include that button for some reason.  You’ll need to assign that button through the command line interface:

  • Exit the FLIRC setup program (a must)
  • Access command line mode on your PC (select Accessories from the Start Menu and select Command Line, or run a command called “CMD”)
  • Go to directory where FLIRC is installed (usually /Program Files/FLIRC) ** when typing the first command, include the double quotes
  • cd "program files"
    cd flirc
  • Run the following command:
  • flirc_util record pause
  • Hit the Menu button on the Harmony remote
  • Now run the second command:
  • flirc_util record print_screen
  • Hit the Record button on the Harmony remote

5) Connect the FLIRC dongle to PS4

The dongle too wide to fit the front slot on the PS4, you can:

  • Remove the clear casing by prying it open with a small flat screwdriver so it’ll fitFLIRC dongle
  • Run an USB extension cable from the back

Most of you probably know this but to turn off your PS4, hit the Menu button to get back to the main menu, then hit up to select the PS4’s sub menu, and the power options is on the far right.

That’s it!  Finally we have one remote to rule them all (except for starting the PS4)

2004-2008 Maxima – Fixing Power Door Lock Actuator

The power door lock on the front passenger side had been having trouble unlocking for months and it seemed to finally stopped working.  The degrading performance is a good sign, meaning that it should to be the motor dying and not something like a gear mechanism problem, which would have been much harder to fix.

I’m a bit surprised that there isn’t already a lot of guides or threads talking about fixing power door lock, so I hope that whatever info I share is in fact useful and not just repeats of what’s been posted years ago.  If so, please ignore my post. 🙂

If your power door lock is having issues, it only takes $5 to replace the door lock’s actuator motor.  Don’t spend that 95 bucks on a new one. 🙂  If you DIY you also save another hundred on labor.

Tools needed –

  • medium sized flat screwdriver
  • 10mm socket wrench with extension
  • T-28 screw bit on a wrench or electric screwdriver
  • wire cutter with a flushed side
  • needle nose pliers
  • brake cleaner or alcohol

Parts needed –

Actuator motor with a dimension of 30mm x 24mm with 18mm flatsides, and a 2mm diameter shaft.  Just search for “actuator motor” on Ebay (cost $5).

Step 1 – Follow 1A Auto’s guide (http://www.youtube.com/watch?v=XFNlAGfgtTA&index=14&list=PLCAE369BA64B3AB79) on how to remove the door panel to get started.  You can keep your window rolled up and taped in place as we have no need to remove the window assembly.

TIP – remove the wire clips/retainers after the inside panel had been removed.  You can then access the back and remove them properly by pinching the retainers.  Video shows the guy spending minutes trying to remove them with a screw driver, which risk breaking them and damaging the foam padding.

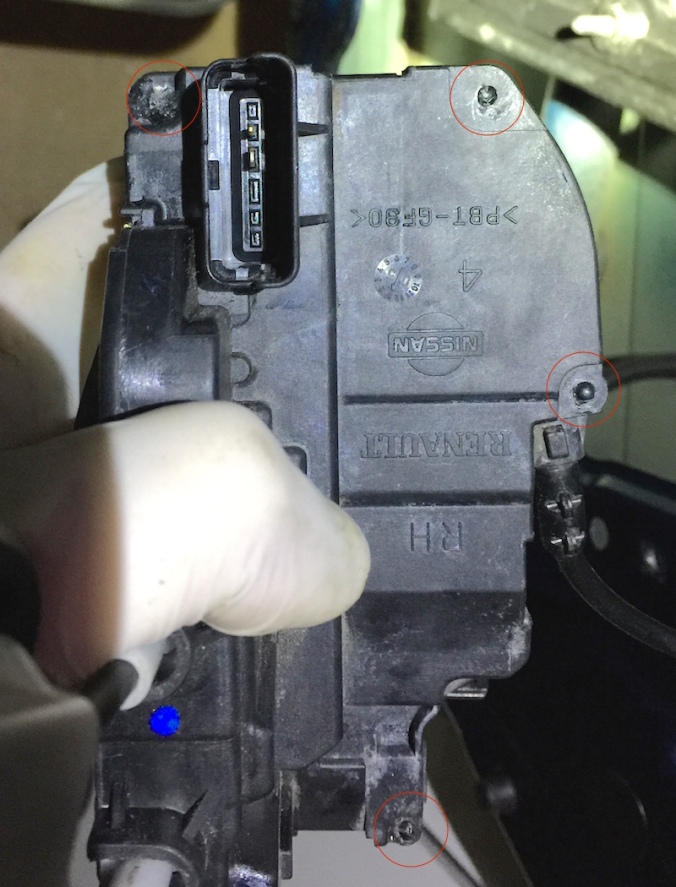
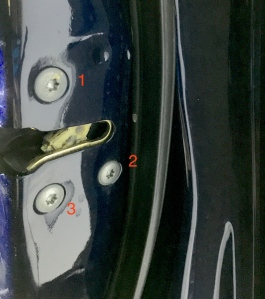
Step 2 – Once you have removed the inside panel, you should have access to the door lock actuators.  Unscrew the three screws that told it in place:

IMG_0603

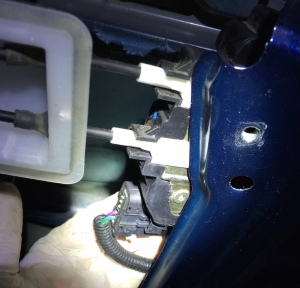
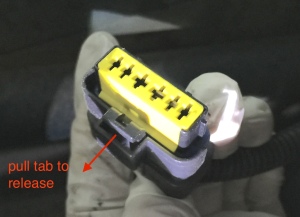
Step 3 – There is a wire connector on the actuator, remove it by pulling, NOT PUSHING the connector tab

IMG_0604 IMG_0602

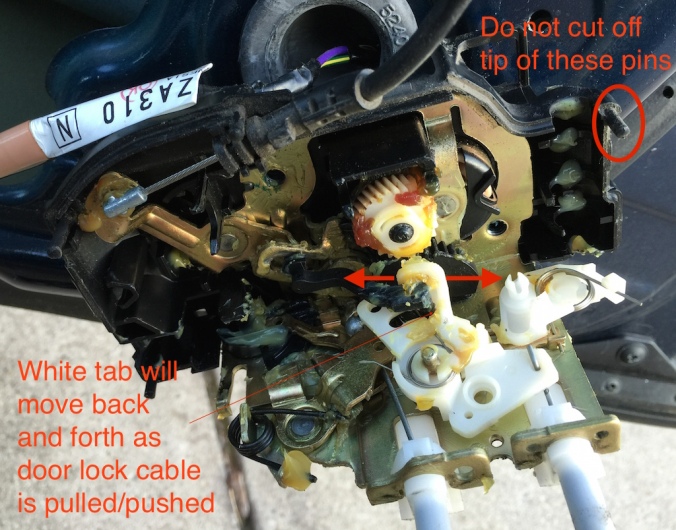
Step 4 – You can immediately take the actuator apart even though there’s still a cable connected to the door handle.  Start by removing the heat sealed pins with a wire cutter but DO NOT cut the whole pin off.  Just squeeze lightly at the plastic around the pin then pry upwards, and the melted plastic should pop off as a ring.

IMG_0607

Now use a screw driver and carefully pry open the retainers on the sides of the actuator.  Takes a bit of elbow grease to pull the cap apart, but there’s no trick to it.  Even if a tab or two breaks, you can still glue things back in.

Step 5 – Once the cover is off, confirm that the door lock in in fact working by pulling and pushing the cable that connects to the door lock.  The end of that cable has an L shaped pin, not the ball shaped joint.

IMG_0590

Then it’s time to replace the motor.  You’ll see the motor that’s attached to the actuator’s cover.  It comes off easily by prying with a screw driver.  The trick now is to pry off the worm gear from the motor and attach it to the new one.  You might need to cut the shaft off the new motor to make things work.  Sorry I did not perform this step as I ended up fixing the motor itself.

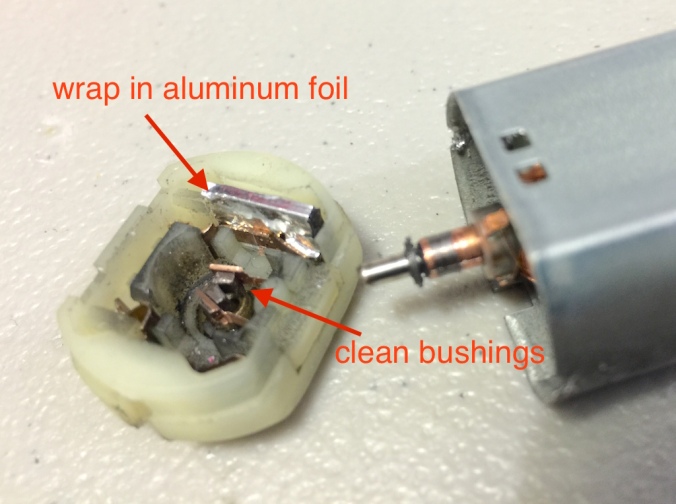
Step 6 – (optional) Fix the motor if you’re a cheap bastard and don’t want to spend the $5. 🙂  With your pliers, pry open the side tabs that are holding the end cap.  It helps to mount the motor on a vise. 

Once the end cap is off, clean the brushes with brake cleaner or alcohol, then remove and wrap the thermo protection plate with aluminum foil.  This will make the motor work again, but now the motor can potentially burn up if the lock is stuck.  I didn’t know the motor’s size until I opened the actuator, and now I don’t want to wait for one to ship, so I went with this cheap route.  For the rest of you, I highly suggest spending that $5 and have a new motor ready before you start.

IMG_0595

If you have a 12v power supply, feed 12v directly to the motor on both polarities and make sure it’s working.

Step 7 – Time to put everything back together.  I suggest using some glue on the pins of the actuator, or even on the sides of the casing.  Try flexible glue like Goop or Gorilla glue.

Step 8 – Test for functionality.  Connect the wire harness to the actuator and try locking/unlocking with the remote.  The wire that goes to the door lock should pop in and out.  If it’s not happening, chances are the white plastic tab inside the actuator is out of place and it’s a simple fix. 

Step 9 – Install the door lock actuator back.  REMEMBER TO CONNECT THE WIRE HARNESS!

Step 10 – Install door panels.  In the door panel removal video, the tech installed the power window unit before installing the inside door panel, but you can save time by just putting the inside door panel in place and then screwing the power window unit back on.  Start with the power window motor.  Put one hand behind the panel to guide the motor so the holes align.  After you screw the bolts in by hand, guide the power window rails in a similar fashion.  Might take a bit of pushing but it’s very straight forward.  As soon as the inside panel is installed, test your window and make sure it’s working.

FINISH

Hope this help whoever’s having problems with their locks.  Compared to fixing that damn transmission issue with the valve body, this is a cake walk.